Tag Archives: cable management

How to Choose 24 Port Patch Panel

Undoubtedly, patch panels have become an important component in cabling system, since technological advances open the door to a new generation of more efficient and higher performance data centres. According to different ports, patch panels are commonly divided into 24 port patch panel, 48 port patch panel, 96 port patch panel and even more ports. And all the patch panels can provide a simple, neat and easily managed solution for IT technicians. Today, we’ll focus on 24 port patch panel buying guide.

Why We Use 24 Port Patch Panel

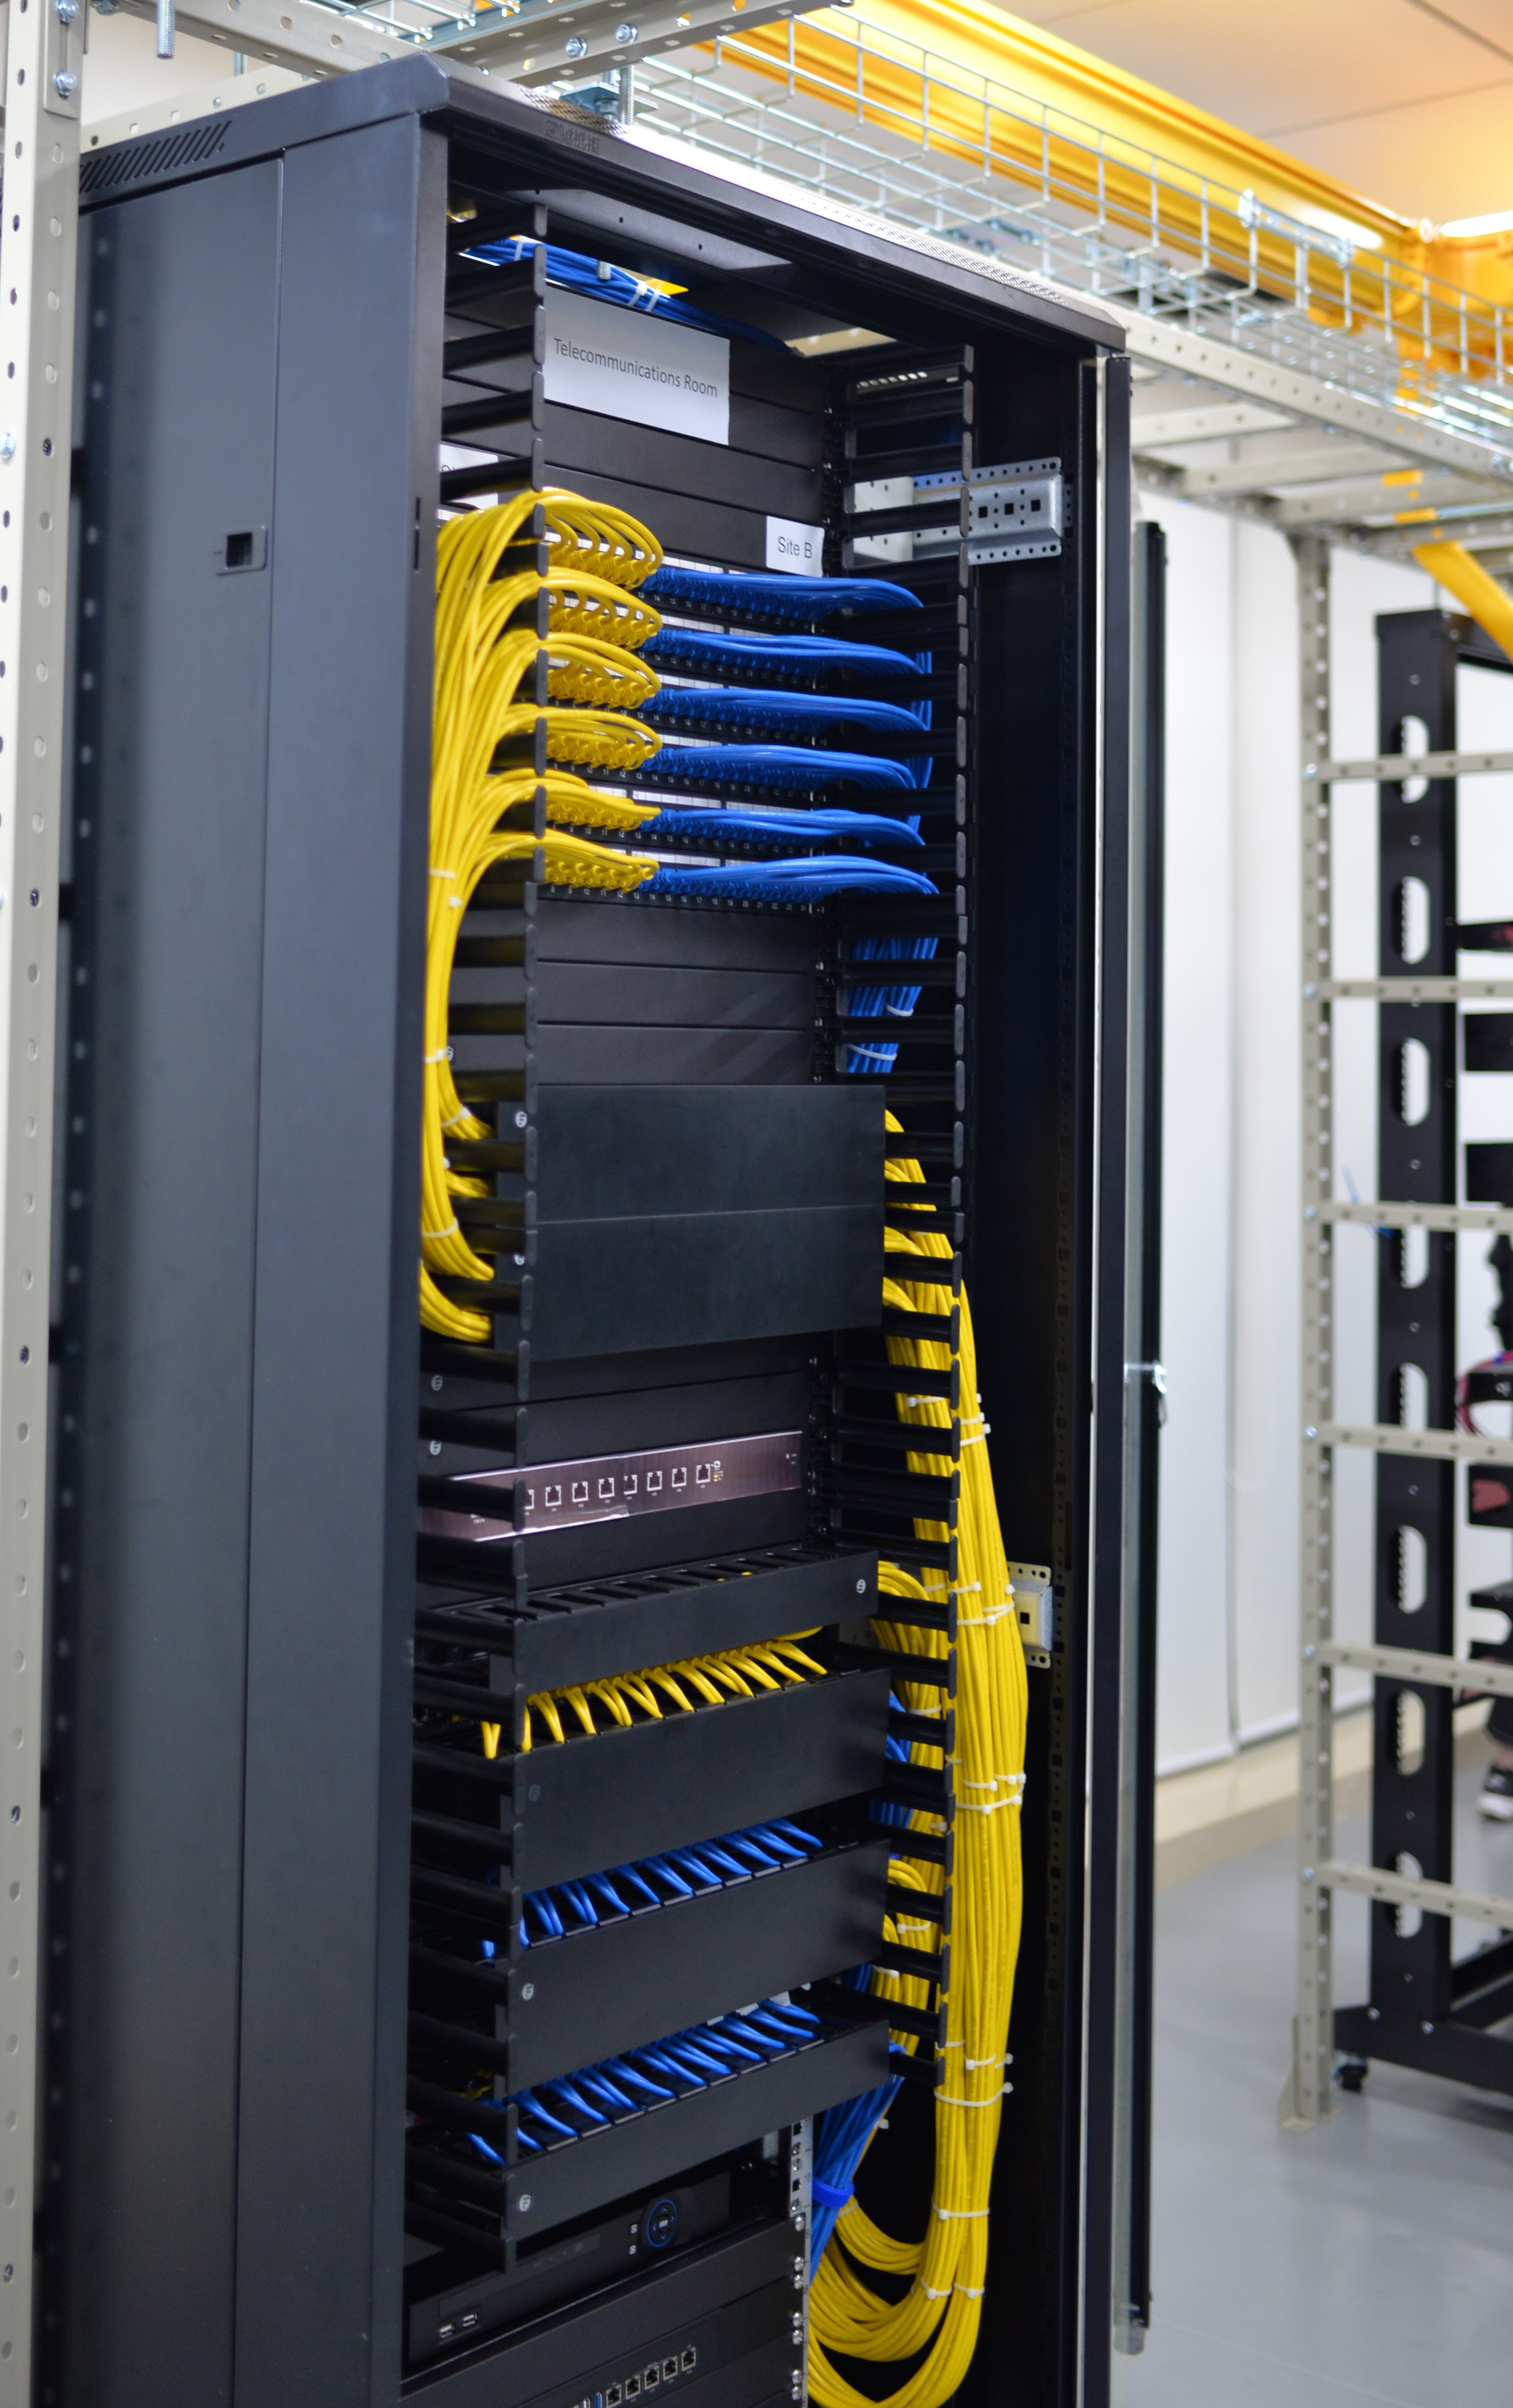
As we know, using a patch panel can enjoy many benefits. It can reduce cable congestion, improve flexibility and scalability and save the valuable space in a sever rack. These contribute to the simplification of manual monitoring, testing, routing and other maintenance on cables. Besides, the  24 port patch panel price is more favorable than other patch panel types. And designed in the same size, the ports distances of 24 port type is not as compact as the 48 port or 96 port ones, which is better for cable connections and cable cooling. This encourages people to choose 24 port type instead of the others.

24 Port Patch Panel: Copper or Fibre

As the backbone of a structured cabling solution, patch panels are available in copper and fibre versions. They are designed to connect different cables. Copper patch panel are used to connect the specific cables like Cat5, Cat5e or Cat6, while fibre patch panel is only applicable for single mode or multimode fibre cables with LC, SC connectors. Thus, before we buy 24 port patch panel, we must know what type of cables that used in our network.

24 Port Patch Panel Recommendation

FS.COM offers a wide variety of 24 port patch panel to help address your specific needs.

24 Port Patch Panel Cat5e

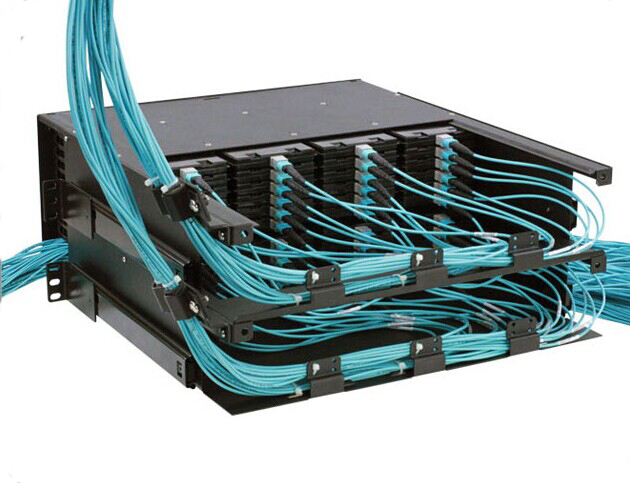
This 1U 24 port patch panel Cat5e features RJ45 couplers on both sides of each panel. It uses the removable design of the rear cable manager, which is conducive to uninstall and install. Also, it adopts the design of self-contained cable management tool, and no extra cable management equipment is needed. This Cat5e patch panel is made of SPCC+ABS materials with an operating temperature from -25℃ to 70℃.

 1U 24 Port Patch Panel Cat5e

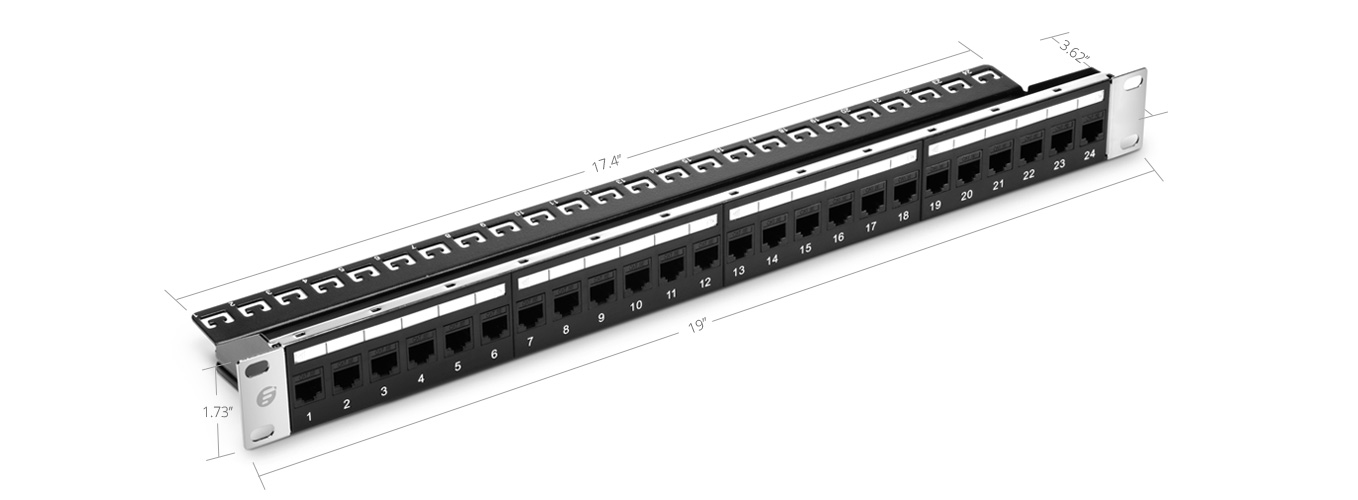
Figure 1: 1U 24 Port Patch Panel Cat5e

24 Port SC Fibre Patch Panel

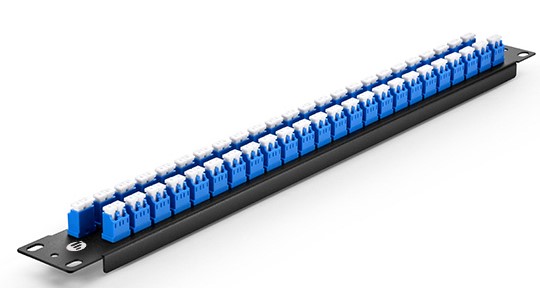
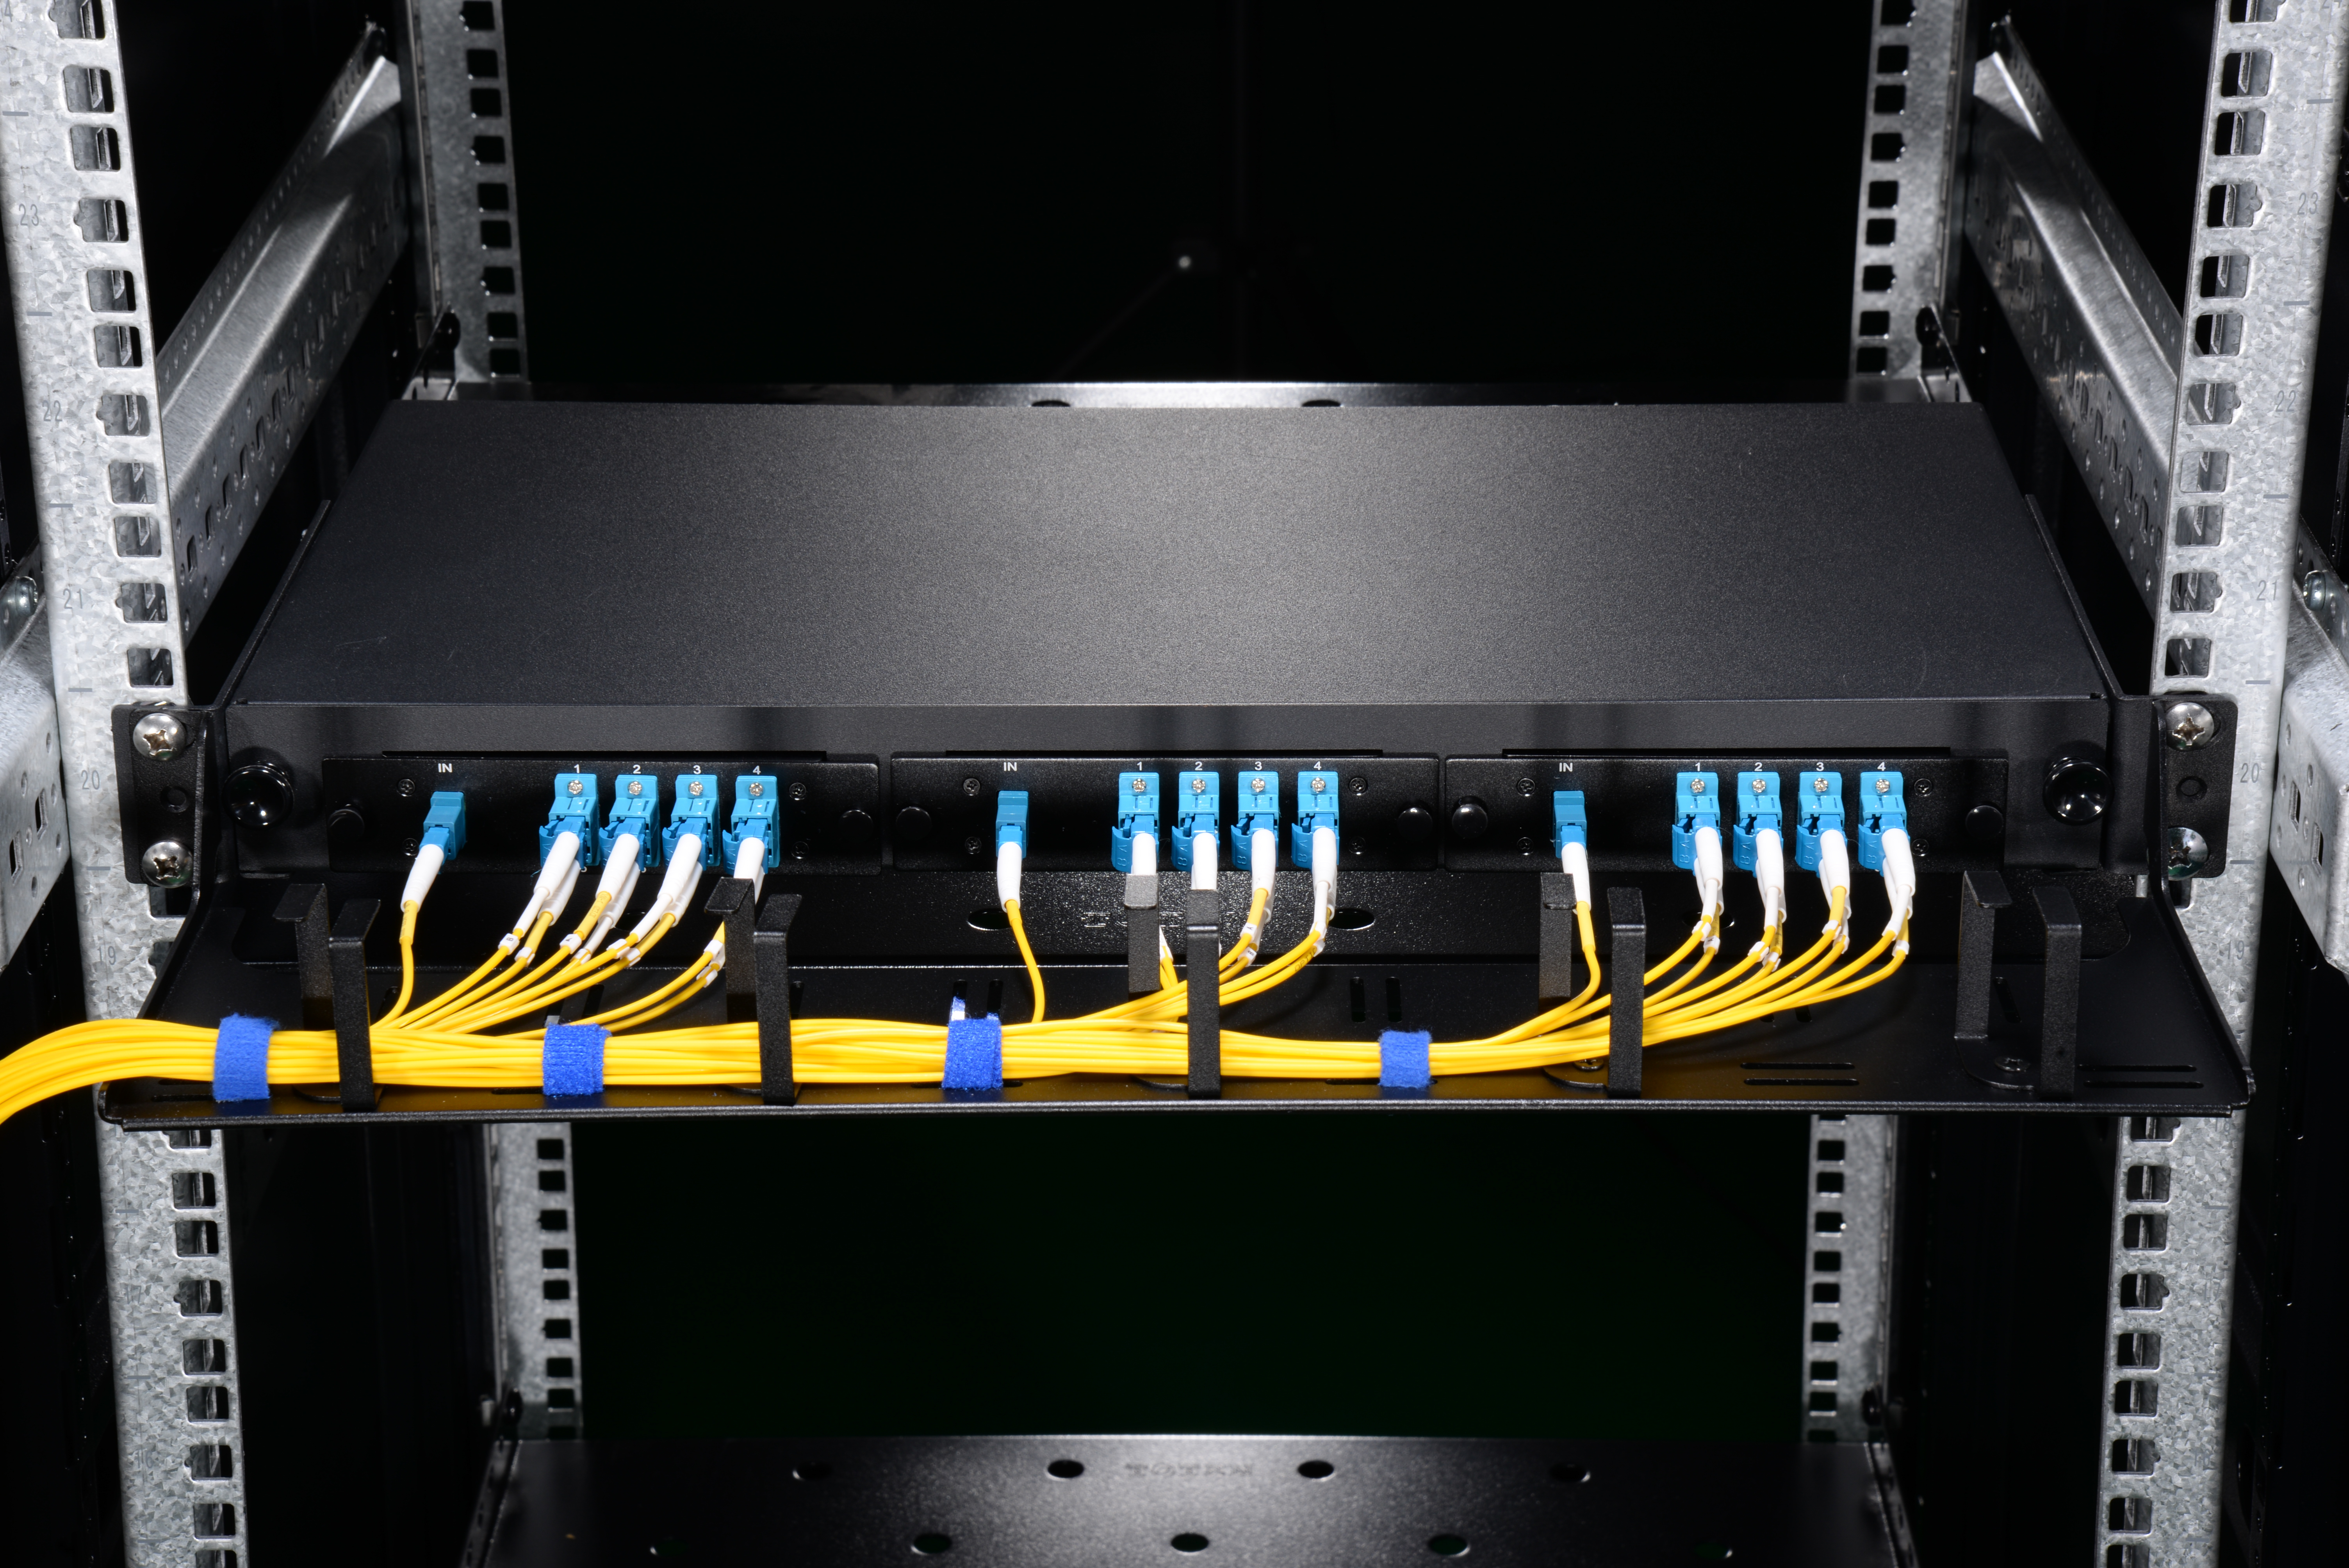
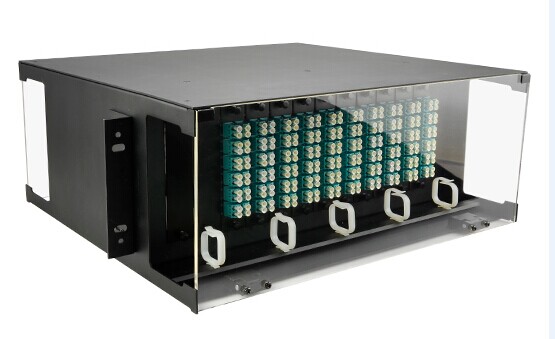
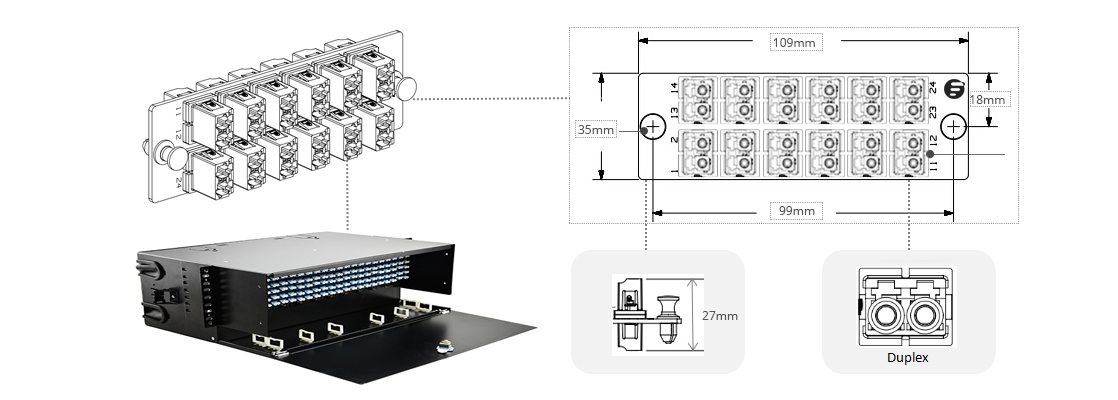
This fibre patch panel is applied to connect OS2, OM3 and OM4 fibre cables. Its sleeve material is ceramic, and its colour-coded couplers will facilitate quick cable type identifications and permit more accessibility during troubleshooting, installation or redeployment.

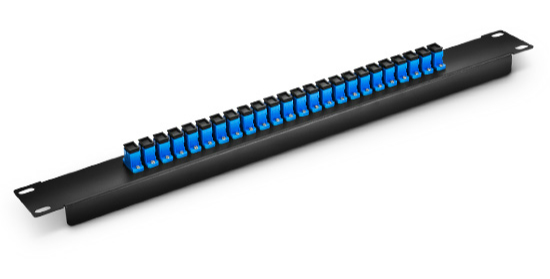
Figure 2: 24 Port SC Fibre Patch Panel

24 Port Blank Keystone Patch Panel 

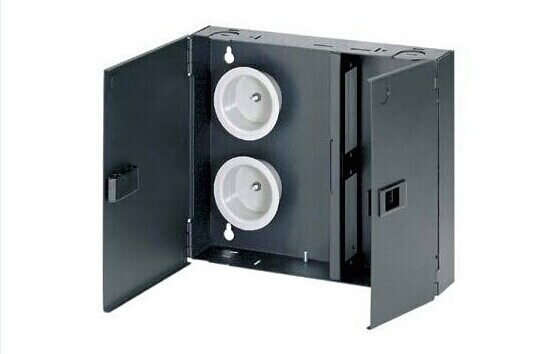
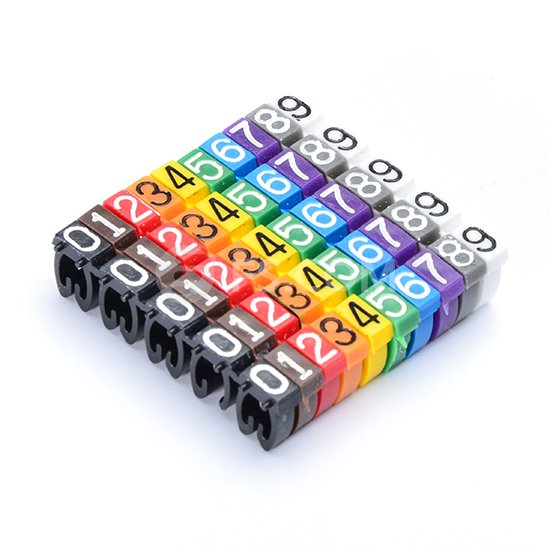
The 24 port blank keystone patch panel is an ideal tool to manage all copper cables like Cat6 or Cat5e, so you can customize your patch panel and create a perfect mix connection based on your specific applications. The lacing bar with sequential port labels integrated into the panel provides easy identification of multiple types of cables, which can manage cables more efficiently. Designed with the SPCC + ABS plastics,  the material is stamped and formed to create a rigid and durable surface capable of withstanding the forces generated while punching down cables to the panel.

24 Port Blank Keystone Patch Panel

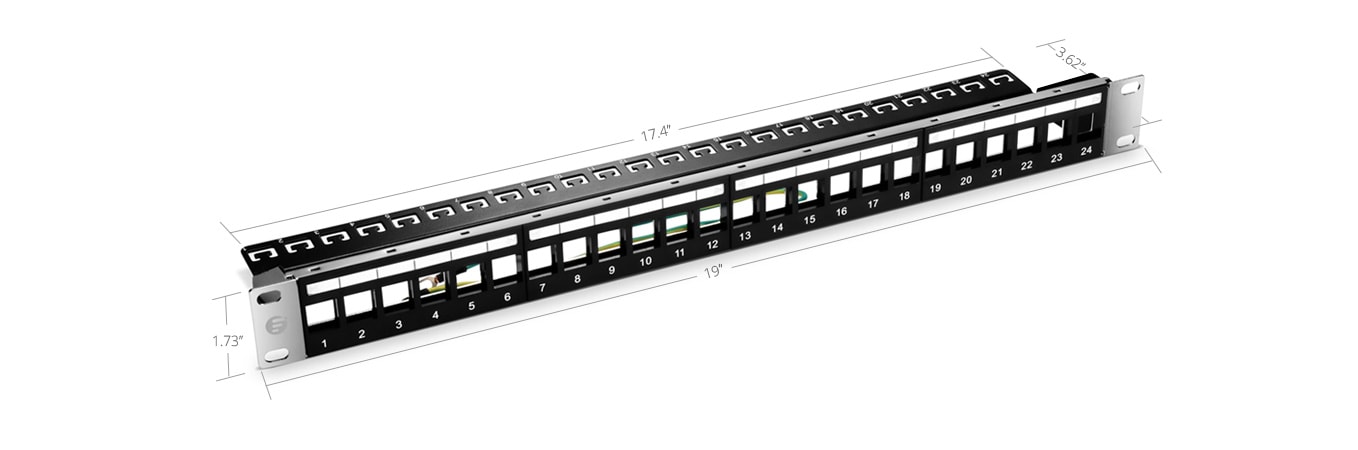
Figure 3: 24 Port Blank Keystone Patch Panel

Conclusion

From the above, I suggest if you need to connect copper cables such as Cat5e or Cat6 then choose the 24 port patch panel Cat5e or 24 port patch panel Cat6 type. If your cables are fibre cables, 24 port fibre patch panel is suitable for you. If you want to make the mixed connections, 24 port blank keystone patch panel is the best choice. So if you are ready to buy 24 port patch panel, please don’t be hesitate to visit FS.COM which is a supplier that offers a comprehensive range of patch panels designed to address a variety of needs.

Come to the New Tool of Horizontal Cable Management

Horizontal Cable Management Review

As one of the important tools in horizontal cable management and the assist of fibre panel, the horizontal cable manager has been warmly welcomed by the public since its debut. The horizontal cable manager comes in varied types such as brush strip cable manager, finger duct cable manager. And the height of it may vary as the network system demands. The fantastic design horizontal cable manager with finger duct is what we will talk about today.

Horizontal Cable Manager with Finger Duct Overview

The FS.COM finger duct horizontal cable manager is designed with flexible fingers, rear pass-through holes and a removable cover. It can be mounted to standard 19 and server rack and cabinet providing well-organized cabling quickly and easily. 1U and 2U versions are both available at FS.COM. Unique hinge cover allows for easy cable moves,adds and changes to connections, saving time and money. The soft and durable finger ducts offer proper bend radius and flexible operation of cable management. 2U version increases more space for Ethernet cable runs.The two holes on the main plate allow for front-to-back or back-to-front cable runs. The finger ducts can be used for both upside and downside cable management. Simplify network maintenance and cost, as well as support future growth and cabling demands.

horizontal cable management tool

How the Finger Duct Horizontal Cable Manager Works?

Take 1U finger duct horizontal cable manager as an example, it can be mounted above or below the fibre optic patch panel, with the hinge cover side facing towards us. Open the cover and 12 gaps between 11 finger ducts. The cable is inserted into the above patch panel, and then 2 cables share a same gap. The left 6 couples of cables are all combed to the left vertical cable manager, and the right 6 to the right horizontal cable manager. The two holes on the back of the cable manager are designed for the cables inserted to the below patch panel. The procedure is all the same with the front cabling.With all the cables in their position, you can load the cover.

Vertical and Horizontal Cable Manager

Vertical cable manager is standing vertically on both sides of the cabinet, while the horizontal one is mounted in the cabinet. In addition, whatever the height of the cabinet is, the vertical cable manager can satisfy your needs by mounted with each other. You can choose them according to your actual needs. However, the combination of them shown in the video is no doubt the optimum option. The more detailed information of the two cable managers:Horizontal and Vertical Cable Management At a Glance

This cable manager with finger duct is an optimum option for your horizontal cable management. Get it to protect your equipment, improve the appearance and accessibility of your rack. I am sure you will be content on its hassle-free compatibility with your rack. Any question or puzzle is expected to be asked immediately. With your recommendations, we can go further and grow faster. And also, we sincerely hope that with our products and service, you can gain in both work and life.

Horizontal and Vertical Cable Management At a Glance

When the fibre patch panel is loaded with cables, your cabling is almost finished with the core elements all ready. You can achieve fast and smooth Ethernet connectivity. But turning around, you may find a mess caused and left by the installation. The slack cables without careful comb are hung casually, resulting in a sloppy look just like the noddles being stirred. If we have a look at an expert, it is common to find that they all manage their cables in a good order. And today, we will reveal the secret of the marvelous layout — horizontal and vertical cable management.

Horizontal and Vertical Cable Management

When you try to simulate others’ cabling system, you will inevitably find that the cable management comes in two varieties, horizontal and vertical. When installing cables in a fibre enclosure, you will undoubtedly have to run them both vertically and horizontally. The best solution for this cabling is to run all the cables horizontally from the server directly to the vertical cable management rack.
With these two solutions, you can gain many benefits like enhanced availability through reduced downtime, and improved system performance through reduced crosstalk and interference. We all know that crosstalk is harmful and will damage more or less the data transmission. What’s more, it enables us easier and safer access to individual components so as to achieve improved maintenance and serviceability. And the moves, adds and changes will be simplified.

horizontal and vertical cable management

Horizontal and Vertical Cable Manager

With horizontal cable managers, the cables from equipment in racks can be routed neatly and properly and away from damage. If you are using flat-faced patch panels or network switches form which cables come above or below, horizontal cable manager will complete the support pathway for patch leads between the cabling section and the exact connection point (port) on the patch panel or switch. Alternately, horizontal management can be used to create rack-to-rack pathways for patch leads. The FS.COM finger duct horizontal cable manager is designed with flexible fingers, rear pass-through holes and a removable cover. It can be mounted to standard 19 and server racks and cabinets providing well-organised cabling quickly and easily. 1U and 2U versions are both available at FS.COM.

horizontal cable management

Vertical cable manager just as seen in the below image, utilises the additional space at the both sides of the cabinet to manage the slack from patch leads, and make sure that they can easily route the largest cable diameter in your plan. For static environments, you can consider installing another vertical cable manager behind the racks, which does not block access to components in the space between the racks. Vertical racks can be also installed under a desk or against a wall and accommodate networking equipment up to 4 RU. Its dual sided fingers enable both front and back well-organised cabling.

vertical cable management

Conclusion

With horizontal and/or vertical cable managers, the human errors which may be committed previously due to the confusion of a mess of cables can be easily prevented in horizontal and vertical cable management. Once you have to deal with fibre and copper cables at the same time, apart from our multimedia modular panel, FS.COM cable managers can be used to house and organise fibre and copper cabling while keeping separation between the two.

Fibre Optic Patch Panel Best Practices

The fibre optic patch panel, one type of the patch panels, is getting more popular with many expertise and customers getting to use it. It rides the waves of the optic product and meets appropriately our demands. As the fibre is fed through a coupler, the fibre patch panels are a lot easier to install and no hardwiring is needed.

What Is a Fibre Optic Patch Panel?

Fibre optic patch panel, also known as fibre distribution panel, serves as a convenient place to terminate all the fibre optic cable running from different rooms into the wiring closet and provides connection access to the cable’s individual fibres. Fibre patch panels are termination units, which are designed with a secure, organised chamber for housing connectors and splice units. Fibre patch panels are available in rack mounted or wall mounted and are usually placed close to terminating equipment (within patch cable reach). Both types can house, organise, manage and protect fibre optic cable, splices and connectors. Rack mount panels also come in flat and angled versions.

fiber patch panel

Why We Use Fibre Optic Patch Panel to Manage Cables?

Of course, if we skip it and just connect all cables directly into the hub, then we will miss the following advantages:

You can label the patch panel so you know which room the cable run goes to. Putting the labels on the cables is tougher to read than labels on a patch panel and there is also a risk of falling off. Having patch panel will become very handy and achieve neat cabling.

Best Practices in the Installation of a Fibre Patch Panel

In this part, we will use a 12 port rack mount fibre optic patch panel as an example. And the main body can be divided into 3 parts, namely cable preparation, splicing, and patch cable installation.

First, prepare fibre optic cable or blown tube as required and secure the network cable to the rear of the panel by using cable ties. For the easy operation, we need to unscrew and remove the splice tray. In addition, we need to cut the cable jacket off to punch down but avoid excess to limit crosstalk or damage. Then, splice input fibres onto the pigtails or field terminate connectors as applicable. Finally, put the cables in the panel form its back. Remove the protective covers of both the adapter and the connector and clean the connectors and place them in the adapters.

Conclusion

In a few words, a fibre optic patch panel gives you a very good cabling organisation. The better cable management can spare you a lot of energy and time in case that you do trivial things. Though many people view it as a waste, I believe that everything has its meaning to exist in the world. What matters most is whether you can take advantage of it and apply it to the situation where it is actually needed.

48 Port Patch Panel—Best Choice

As we have learned before, port density is a critical concern when choosing a patch panel. Usually the patch panel with more ports enables more connectivity. Common patch panels are always designed in 12 or 24-port configurations. Does it mean that the more ports one patch panel has, the better it will be? However, as far as I am concerned, it may not always be versatile because more ports means more money. Sometimes you just want a patch panel for household use, then a 128-port patch panel is a waste and you need to take care of the ports idled. If you haven’t determined which system you will apply it to, a 48 port patch panel may be a good choice.

Benefits of 48 port patch panel

In fact, a 48 port fibre or copper patch panel is totally enough for home and office use. And the fibre patch panel also has two types as singlemode and multi-mode one. And the advantage of using a 48 port patch panel is that it allows manual monitoring, testing, switching, routing, and other maintenance to be handled quickly because the cables in the front that connect to the more permanent cables in the back are configured and made so that changes can be made quickly and easily when needed.

48 Port Copper Patch Panel

With the copper patch panel, each pair of wires has an independent port. So copper patch panels offer simple and efficient interconnection in Ethernet applications. And when the front copper touches the copper in the back, a little bit of the signal is lost but not enough to worry about. Take the HD-48P-E1U 48-Port 1U Rack-Mount UTP Blank Keystone/Multimedia Patch Panel as an example, it manages and organizes the cabling in your network. The rear cable manager keeps cables neat, tidy and efficiently organized on the back of the panel. Ports are clearly numbered to help you identify connections.

Both the copper and fibre patch panels can provide you with flexibility and scalability, because the network can grow and change on-demand, without the costly, labor-intensive hassle of replacing channels end-to-end. For more information about fibre and copper patch panel, you can refer to this Which One to Choose? Fibre or Copper Patch Panel.

Singlemode and Multi-mode Fibre Patch Panel

The fibre patch panel, 96 Fibres, 48 Ports LC Duplex 9/125 Singlemode Fibre Adapters, 1U High 19″ Fibre Patch Panel from FS.COM, offers the highest port concentration and bandwidth over high performance structured cabling to all network areas, whether in the data centre or in the high performance LAN. By managing varying port densities and speeds in a single high-density patch panel, you save valuable rack space, helping to lower data centre costs.

singlemode patch panel

And the 96 Fibres, 48 Ports LC OM3/OM4 Multimode Adapters, 1U High 19″ Fibre Patch Panel can be used as a junction for 50/125 Multi-Mode Fibre with LC connectors. The panel fits a standard 19″ rack, and the LC connectors are standard sized too. Its high-density and easy maintenance allow a low initial investment cost. With it, you can only buy the devices you need now, while leaving room for future expansion.

multi mode patch panel

Conclusion

In a word, a 48 port patch panel makes it easy to organize the fibres in an business or home network.With a 48 port fibre patch panel, you can achieve a better cable management. Of course, one could skip the patch panel and just connect all connectors directly into the hub, however, you need to label the patch panel so you know which room the cable run goes to. But it is tougher to read than labels on a patch panel and also there is risk of having the cable labels fall off. All I want to inform you is that a 48 port patch panel is not expensive in FS.COM. Please feel free to contact us.

Wall Mount VS Rack Mount Patch Panel

Patch panels are termination units, which are designed to provide a secure, organised chamber for housing connectors and splice units. Its main function is to terminate the fibre optic cable and provide connection access to the cable’s individual fibres. Patch panels can be categorised into different types based on a few different criteria. Last time, we have shed light on the copper and fibre patch panel and now let’s learn a different pair of it, namely wall mount patch panel and rack mount patch panel.

Wall Mount Patch Panel

As the name suggests, wall mount patch panel is a patch panel fixed on the wall.The wall mount patch panels are designed to provide the essential interface between multiple fibre cables and optical equipment installed on the customer’s premises. The units offer networking and fibre distribution from the vault or wiring closet to the user’s terminal equipment.

This kind of patch panel consists of two separate compartments. As shown below, the left side is used for accommodating outside plant cables entering the building, pigtails and pigtail splices. Whereas, the right side is designed for internal cable assembly networking. And both sides have a door secured with a quarter turn latch.

wall mount patch panel

Rack Mount Patch Panel

The rack mount patch panel usually holds the fibres horizontally and looks like a drawer. Rack mount panel is designed in 1U, 2U, 4U sizes and can hold up to 288 or even more fibres. They can be mounted onto 19″ and 23″ standard relay racks. The rack mount enclosures include two kinds. One is the slide-out variety and the other incorporates a removable lid. As for the latter one, the tray can be pulled out and lowered to 10 degree working angle or even further 45 degree working angle to provide ease of access for maintenance or installation work.

rack mount patch panel

Wall Mount VS Rack Mount Patch Panel

  • Installation

When installing wall mount patch panels, users need to leave at least 51mm additional space on each side to allow opening and removing the doors. Although it can be easily mounted to the wall by using the internal mounting holes, four screws are required when it is attached to a plywood wall, expansion inserts with wood screw for concrete walls and “molly bolts” for sheet rock. However, the installation of a rack patch panel just needs four screws without drilling the wall.

  • Space Occupation

Thinking from another perspective, the advantage of wall mount patch panels is that they allow you to optimise your work space by keeping equipment off floors and desks,which is superior to the rack mount patch panel.

  • Application

Both panels can be applied to Indore Premise Networks, Central offices (FTTx), Telecommunication Networks, Security Surveillance Applications, Process Automation & Control, Systems and Power Systems & Controls, while the rack mount patch panel has an advantage over the wall mount patch panel in that it can be applied to Data Centres.

Conclusion

To sum up, patch panels are available in rack mounted and wall mounted and are usually placed near terminating equipment (within patch cable reach). Both types can provide an easy cable management in that the panel ports can be labeled according to location, desktop number,etc. to help identify which cable from which location is getting terminated on which port on the patch panel, and changes can be made at the patch panel. The world-wide renown FS.COM can provide you the best quality rack mount and wall mount patch panel. Buyers are welcome to contact us.

Dos & Don’ts of Cable Management

Just imagine how would you feel when you face cable spaghetti? You must say, “oh, it’s very annoying.” Yes, that’s right. Improper cable management can bring disadvantages like heat retention, untimely hardware failure, and maintenance headaches. So how to avoid cable spaghetti and keep network cabling in a good organization?

cable management

Since cable management is one of the most important factors of data centre design, it’s necessary to master some cabling skills. The following content will give you some suggestions for cabling installation.

Don’t Pull Fibre Jumpers too Hard

When installing cables, pulling issue can’t be avoided. Pulling cables too hard can damage them by stressing the core. Stressing the core will affect the signal performance. In extreme cases, it will cause unwinding of the twists in the sheath. Under this situation, you should better buy high-quality patch cords from reliable manufacturers or vendors. Good optical fibre is able to withstand the stress. Because cheap cables have sub-standard sheathing and narrow diameter cores which can cause signal loss. A smaller core is also more fragile and weak, more likely to bend, leading to an increased rate of cable failure.

Don’t Ignore Labels

Cable labels are very likely to be ignored by engineers. After finishing cable installation, they always think they can remember every cable type, including the network cables, power cables, patch cables, etc. Things don’t happen like you wish. Your memory will disappear as time goes on. Thus, you should not overlook labeling which can help you identify cables in a short time and leave messages to other installers to easily decipher what goes back.

cable label

Don’t Forget Cable Ties

Cable ties are cheap and useful to get a clean look of your data centre. Today there are many categories in different sizes with many colours. Nylon and Velcro ties are the most two common kinds. Velcro ties are better than plastic ties because they are easy and quick to add, remove and reusable. Nylon cable ties can put much stress on cable bundles and cause pressure points on the cable jacket, changing the cable geometry and thus decreasing performance. What’s more, Velcro ties can be cut easily to any length you need.

Measure the Exact Cable Length You Need

Usually, it says the longer, the better. But it’s another case for network cabling. Improper cable length often causes cable mess. Suppose you have bought 50m patch cable. However, you just use 20m. Then how to deal with the spare 30m cable? Just leave it alone? Of course not. So you’re advised to measure the exact cable length you need. Custom cable is the best solution for you to get the right length.

Leave Space for Cables Trays

What if very long cables are left in your network system? You may consider putting the cables into the cable trays. But it’s not a good idea. Cable trays should not be overloaded. Suspended cable trays are mounted to a rack or something. If it’s too heavy, the cable trays may fall off and break other expensive things. Too many cables are not only safety problem, but also leads to poor operational practices because it’s too hard or fear of disturbing cables. What’s worse, the cables at the bottom of cable try may be crushed and degrade signal propagation.

Choose a Proper Cable Manager

Cable manager is an economical and efficient solution to manage high density structured cabling in data centres and telecommunication rooms, which allows the maximum amount of cables to be organized in a minimum amount of space. Choose the best cable manager which suits the most for your application. Simple or complex cable manager, vertical or horizontal, plastic or metal, one must meet your requirements for network cable management improvement.

cable manager

Conclusion

Cable management is not an easy work. Some engineers may not take cable management seriously or they don’t care much if there is a little mess. But the improper operation can cause lots of problems. To achieve neat cabling, too many things must be taken into consideration. And some useful tools and equipment are also required. Come to find a perfect cabling solution in FS.COM.

Related article: Fiber Patch Panel for High Density Data Center

Fibre Patch Panel for High Density Data Centre

Fibre optic cable has been increasingly applied to meet the need of high speed network. In data centres, the cabling infrastructure turns to be more complicated. Under that situation, keeping good cable management is necessary since messy cabling will cause fibre optic loss and not easy for troubleshooting. Then fibre patch panels can serve as the tools for cabling systems.

Fiber-Patch-Panel

A fibre patch panel is also called fibre distribution panel. It’s used to terminate the fibre optic cable and provide connection to individual spliced fibres. Besides, fibre patch panels can create a secure environment for exposed fibres, housing connectors and splice unites.

Fibre Patch Panel Types

Fibre patch panels can be divided into two types. Both types can house, organise, manage and protect fibre optic cable, splices and connectors.

One is rack mount enclosure. Usually the rack mount enclosure holds the fibres horizontally and looks like a drawer. Rack mount enclosure is designed in 1U, 2U, 4U sizes and can hold up to 288 or even more fibres. The rack mount enclosures include two kinds. One is the slide-out variety and the other incorporates a removable lid. The sliding design of panels gives engineer easy access to the fibres inside but it’s more expensive. The lid type is less expensive but requires the user to remove the whole enclosure from the rack to gain internal access.

The other is wall mount enclosure. While wall mount enclosure is designed for enclosed wall mounting of adapter panels or splice trays. They are fabricated from steel sheets and finished with a light textured black powder coat. These panels can be easily mounted to any wall using the internal mounting holes. They can protect fibres from dust or debris contamination and organise the cables.

 wall-mount

Fibre Patch Panel Structure

A typical fibre patch panel contains four parts: enclosed chamber (rack mount or wall mount), adapter panels, connector adapters (providing low optical loss connection through mating appropriate connectors) and splice tray (organizing and securing splice modules). Adapters on a fibre patch panel are available in different shapes, such as LC, SC, MTP, etc. Most times, all adapters are of the same type in a panel. But sometimes a panel with different types of adapters is needed when more than one type of fibre optic connectors used in a network.

Fibre patch panel has two compartments. One contains the bulkhead receptacles or adapters, and the other is used for splice tray and excess fibre storage. Patch cable management trays are optional for some patch panels and make possible the neat storage of excessive patch cable lengths.

Fibre Patch Panel Ports

Fibre patch panel ports provide a place for data to enter and exit the panel. The number of these ports vary from 12, 24, 48, 64, 72, 96 to 288 and even more. Actually there is no limit to the number of ports on a patch panel. As long as there is enough room, you can fill the enclosure without interfering with the integrity.

FS.COM offers a 288 fibres 4RU rack mount fibre optic enclosure, loaded with 12 slots duplex fibre adapter panels. This high density patch panel provides a flexible and modular systems for managing fibre terminations, connections, and patching in all applications. With its high fibre densities and port counts, it maximises rack space utilization and minimises floor space. This enclosure makes it easy for network deployment, moves, adds, and changes. It’s a perfect solution for engineers to do the fibre termination and distribution.

288-fiber enclosure

Fibre Termination in the Patch Panel

In a patch panel, pigtail or field termination can be used for the connection. If it uses the pigtail approach, a splice tray is needed in the patch panel. This method provide the best quality connection and is usually the quickest. The second method uses fibre optic connector for field termination. A fibre optic connector is directly installed onto the individual fibres. This method usually takes longer time than pigtail but doesn’t need a splice tray in the patch panel. However, the connection quality may not be as good as pre-terminated pigtails.

Summary

Fibre patch panels are very useful especially in the high density data centre. They feature with the benefits of easy fibre installation, maximum flexibility and manageability. Although patch panels are attractive, it’s the best only when it fits your application. No matter rack mount or wall mount type, loaded or unloaded, you should better choose the most suitable one based on your own situation.

Related article: Dos & Don’ts of Cable Management

Effective Cable Management Is Almost Like An Art Form

As the modern workplace and family become more complicated and the use of more technology, so a lot of cables, infiltrate into our daily life is in proportion. In order to prevent becoming lost in the tangle, effective cable management is essential. Fortunately, there is a wide range of products and cable accessories in the market, this task is a little easier than ever.

Cable management kits

There are so many different accessories on the market, it can be difficult to know what to buy. For this reason, the cable management suite is a great choice, because they have a convened a series of items need to clean up and organize effective cable.

These kits come in many different shapes and forms, but all contain a variety of tools for effective cable management. Many contain a combination of cable wraps, ties, and clamps. Others might contain cable trunking and accessories for fireproofing your cables and increasing airflow around them.

FS.COM products’ kits are perfect for added safety and fire prevention and provide a fireproof seal for cables. The FS.COM cable joint kit meanwhile provides an all in one cable jointing solution utilizing PVC and Polyurethane resin.

Importance of Cable Management

Cable management is particularly important in offices and other workplaces which make extensive use of computers and other electric equipment. Without a carefully thought out cabling strategy, server rooms and data centres could end up looking like spaghetti junction, with a tangled maze of cabling scattered haphazardly across floors and walls.

A disorganized cable management strategy is not only a logistical and aesthetic nightmare, it is also a health and safety risk.

Firstly, individuals working in close proximity to the cables might trip over them, endangering both the employee and the equipment.

Secondly, and most importantly, poorly coordinated cables present a significant fire risk. Many fires start as a result of electrical failure, and in the event of a fire, cables that are not protected may as a result of electrical failure, and in the event of a fire, cables that are not protected may perish in the fire, exposing live wires and presenting a further electrical hazard to evacuating personnel.

To protect against such dangers, all kinds of cable management kits and other products with flame retardant qualities are available. The Kopex Flexible Conduit provides a flame retardant cabling solution, featuring a galvanized steel core and a PVC cover, and is both flexible and versatile.

Trunking pillows, such as the Newlec Fire Protection Pillow, can also be used to reduce the risk of fire. These are made of fire-resistant compounds and are utilized to plug holes bored in walls and ceilings for the purpose of electrical cabling. This is vital, because in the event of a fire flames may quickly spread from room to room via any unsealed holes.

Effective And Efficient Cable Management

Effectively management cable is almost like an art form, if do well can save time and money in the long run, and protect your equipment and your workers’ unnecessary risk.

FS.COM Online offers a range of products from cable management (such as Cable Hook, Wire Marker, and cable ties) to lighting peripherals such as emergency lighting, bulkhead light and thorn lighting peripherals, and a range of other cable and electrical products such as cable trunking and cable management items from top manufacturers.

Wire Marker-cable management

Japan Launched Highest Speed 2Gbps Fibre Optic Network, Faster Than Google Fibre

Japanese communication fibre optic network company So-net announced yesterday that they have introduced the world’s highest speed fibre optic networks “NURO optic”, as “one of the world’s fastest” personal commercial fibre-to-the-home cable service, faster than Google Fibre. Its the biggest 2 GBPS download speed, upload speed is 1 GBPS, and supports a maximum speed of 450 MBPS wireless base stations.

To deal with “NURO optic” now is to sign up for two years, monthly 4980 yen, at the same time you need to pay 840 yen fees and 31500 yen for installation cost. But “NURO optic” service has not been extended to all of cities in Japan, only open the Tokyo and the Kanto and other four cities.

So-Net was established in 1995 in November, and in the next year began to provide  fibre optic network services. In 2001, So-Net began to arrive in Taiwan. So-Net Hong Kong is in 2001 to provide broadband Internet access services and with the SONY brand and premium strategy called preemption already saturated cable management Internet users.

In May 2002, cooperate in central Tokyo electric power, electric power company, started to provide fibre-optic Internet service. (In early August last year, SONY announced that it plan to spend 60 billion yen ($764 million) to buy a 42% stake, the rest of the implementation of the company’s sole holding. SONY plans to use the So-Net to enhance Japan and the Asian companies and interactive entertainment experience, and hopes to provide new web fibre optic transmission services project.).