Tag Archives: patch panel

How to Choose a 48 Port Patch Panel?

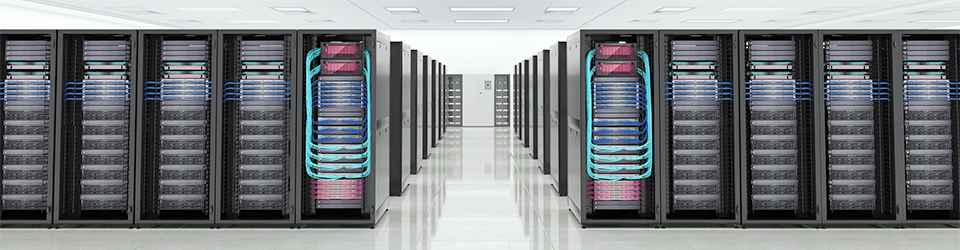
Patch panel, the critical component in the data centre, comes in various types. The port density of a patch panel may not be your primary consideration, but it indeed matters as the ports directly affects the cable management needs either at present or in the future. The number of these ports vary from 12, 24, 48, 64, 72, 96 to 288 and even more. Actually there is no limit to the number of ports on a patch panel. In this article, I’d like to share a buying guide about 48 port patch panel.

48 Port Patch Panel: Copper VS. Fibre

No matter how many ports they have, patch panels can be deployed in fibre and copper cabling system to organize and distribute cables. The 48 port patch panel is no exception. There is no practical difference in performance as the role of patch panels is to direct signal traffic rather than send the signal. However, there is indeed a difference between the cables they will wire. Fibre patch panel is mainly used in fibre optic cable management, while copper patch panel is designed for both shielded and unshielded copper cables like Cat5e, Cat6, Cat6a, and Cat7.

Copper 48 Port Patch Panel Recommendation

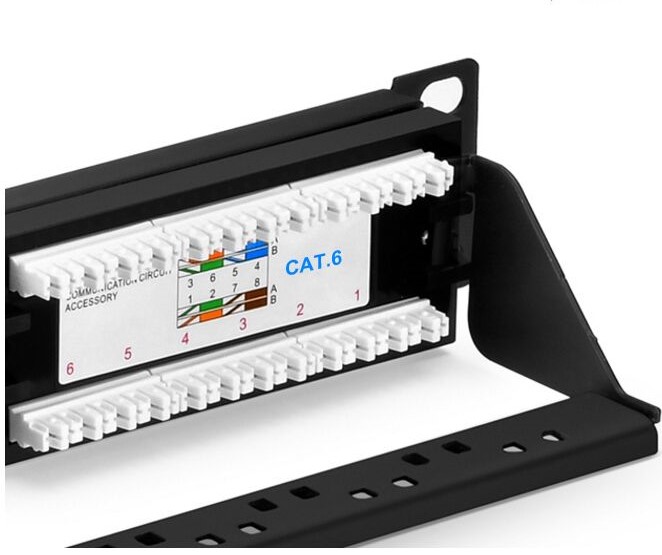
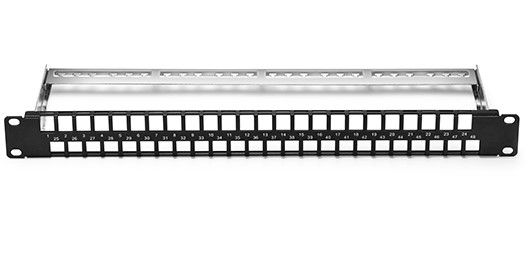
As for the copper patch panel, it is designed according to the copper cable types. Sometimes, Cat5e, Cat6 or other Ethernet cables need to be managed in a single panel. In this situation, the blank keystone patch panels can support mixed cabling with installation of different rj45 insert modules. The 48 ports blank keystone/multimedia patch panel, manufactured by FS.COM, is made of SPCC CRS material. It can accommodate all keystone jacks, including RJ45 Ethernet, HDMI audio/video, voice and USB applications. In addition, the high density 19in wide, 1U High, panel design will save valuable space in the rack. With it, you can customize your patch panel according to your specific application.

copper 48 port patch panel

Fibre 48 Port Patch Panel Recommendation

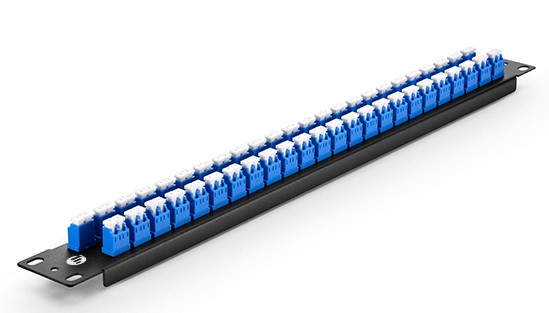
When it comes to 48 port fibre patch panel, you can choose it based on your fibre core, single mode or multimode. 1U 19″ high-density fibre patch panel(ID:69082) can accommodate up to 96 fibres with 48 ports on it. As a fibre patch panel, it supports the OM3/OM4 multimode fibre mode. Designed with LC duplex on both sides, it saves much cost as being fully loaded with fibre couplers. Specifically, FS.COM comes up with an innovative design and cable management. The 1U detachable horizontal cable management panel can protect and organize fibre optic cable in your network.

fiber 48 port patch panel

Roughly the same with the former fibre patch panel, this one, 96 fibres, 48 ports LC 9/125 single mode adapters, 1U 19″ high-density fibre patch panel, supports OS2 9/125μm single mode fibre. Designed with high quality steel adapter panel, it is suitable for 1U 19″ frame rack mount or cabinet. It can meets the requirements in backbone-to-backbone and backbone-to-horizontal fibre cabling.

48 port patch panel

The 48 port patch panels introduced above are all from FS.COM, the company which wins people’s favor by its reasonable price and high quality. This company has been pressing ahead with novel and versatile products and all kinds of cabling solutions.

How to Choose 1U Rack Mount Patch Panel?

1U rack mount patch panel is generally used within a server rack, unlike the wall mount patch panel that is fixed on the wall. Facing the trends like high density servers and converged infrastructure that has result in amounts of cables in the server racks, rack mount patch panel is the perfect way to solve poor cable management at the source. Now I bet you come here because you have to choose one rack mount patch panel of some sort, but don’t know exactly how. Don’t worry, let’s start at the beginning. Before buying it, we should know why we need the rack mount patch panel.

Why Do We Need 1U Rack Mount Patch Panel

The main reason is that 1U rack mount patch panels have close relationship with cable performance. 1U rack mount patch panel as one tool of 1U cable management is the primary factor in maintaining high circuit performance during cable installation and use. It makes all cables connections in order so as to avoid cables becoming tangled and messy, and all changes can be made at the patch panel. Also, with all connections are made on the equipment, rack mount patch panel can save wear and tear on the ports of expensive equipment like switches, which helps reduce equipment cost.

Factors We Should Consider When Buying 1U Rack Mount Patch Panel

Rack mount patch panel seems a simple product, but there are still some aspects make you wonder. The following are the aspects that should be considered when you shopping one 1U rack mount patch panel.

  • Space and port requirement. Before buying a rack mount enclosure, first determine your requirements of space and ports because patch panels are available in different sizes and types. For standardization purposes, rack mounts are usually 19 inches and given in U units range from 1U to 4U. Make sure you know the height, depth, width and weight of the equipment.

  • Budget. Money always is the unavoidable issue. Establish a budget for the equipment, then you can narrow the buying scope and make the final selection.

How to Choose 1U Rack Mount Patch Panel

FS.COM offers different versions of 1U rack mount patch panel to meet customers’ needs. Here are three products and pick one based on your need.

1U Rack Mount Fibre Enclosure  

This rack mount equipment is made of SPCC material with black coating. It can accept 4 fibre adapter panels of LC, SC ports or 4 MTP modular cassettes, which can connect 96 fibres. The top panel uses the demountable design that allows you to put 4 splice trays or 2 slack spools to manage and protect your cables. The equipment is suitable for small or medium communication room with a favorable price of 68 dollars.

1U Rack Mount High Density Fibre Enclosure

Like the former 1U rack mount equipment, this fibre enclosure uses the same material and also can hold 4 fibre adapters or MTP cassettes, connecting 96 fibres at most. But this high density device adopts a new design of parallel sliding drawer that pulls the drawer out you can manage the cables inside the device, instead of removing the top panel. Another creative design is the semi-transparent design of front door, which makes it more convenient to check the inside cables and protect the cables from the dust. It’s an ideal solution for high density cabling with a price of 89 dollars.

1U Rack Mount Ultra High Density Fibre Enclosure

Featured with 3 independently sliding drawers, this ultra high density equipment can house 12 MTP cassettes or fibre adapter panels. Thus, with the 50% increase in usable density, it can connect 144 fibres in 1U server rack. And the open design of the back can improve the airflow which is beneficial to equipment cooling. This equipment enjoys a higher price of 120 dollars for it’s designed to satisfy the most extreme fibre density demands.

The following table is the comparison of the three products.

1U Rack Mount Fibre Enclosure
1U Rack Mount High Density Fibre Enclosure
1U Rack Mount Ultra High Density Fibre Enclosure
Sliding Version
No
 One sliding drawer  Three sliding drawers
Material
SPCC
                  SPCC  Aluminum
Fibre Count
96
 96  144
Price (USD)
                    $68  $89  $120

Summary

If you want to buy a rack mount patch panel with good quality at low price, the 1U rack mount fibre enclosure can satisfy your need. If you prefer to protect cables from dust, the second product is suitable for you. And if you have to deal with ultra high density fibres, choose the last product. Whether you are ready to buy a rack mount patch panel, FS.COM is here to help. Get in touch with us via our website FS.COM.

2U Cable Manager—Assist of Cable Management

What Is the “U” in 2U Cable Manager?

What’s the difference between 1U and 2U cable managers? The most distinguishable one in my mind, is the number lying in their name. The “U”, also known as “RU”, stands for rack unit that is a unit of measure defined as 44.50 millimeters (1.75 in) by EIA. It is most frequently used as a measurement of the overall height of 19-inch and 23-inch rack frames, as well as the height of equipment that mounts in these frames. With this standard, we don’t need to play with complicated numbers, instead, a simple addition can work. For example, a 12U cabinet can accommodate twelve 1U devices or six 2U devices or four 3U devices. And so on.

Where and When to Use 2U Cable Manager

As the data centre grows, you may have many cables to handle, thus the point-to-point cabling is not workable any longer. To realize and maintain a neat and clean cabling, you may need such tools as patch panels, enclosures, and cable managers, among which the cable managers are the primary consideration when you want a good cabling.
1U and 2U cable managers are the most common products for horizontal cable management at present. As people’s demands vary, 2U cable managers come in to being. The 2U cable manager allows for front-to-back and back-to-front cable runs. The finger ducts can be used for both upside and downside cable management. These products can be used above and below patch panel and network switch to organize and store cables.

2U Cable Manager Options

FS.COM offers a wide variety of 2U horizontal cable managers that range from cable manager with finger duct to cable manager with D-rings and cable manager with end rings manager.

2U Cable Manager with Finger Duct

This 2U cable manager is made of plastic in black coat. It is designed with flexible fingers, rear pass-through holes and a removable cover. The cover will enclose the cables within the fixed space, leaving the clean and neat appearance. In this way, people won’t see the tangled or crossed cables in it. The finger ducts are soft and durable, which offer proper bend radius and flexible operation of cable management, keeping the structured cabling system unhurt and totally functional.

2U Cable Manager with Finger Duct

2U Cable Manager with 5 D-rings

As an open-frame cable manager, it is made of metal with five D-rings standing on the panel in a good order. Horizontal cable management panels with D Rings are built with steel for strength and durability. Easily route large amounts of cable through robust rings. The D-Rings organize patch cords and maintain a required bend radius. They are available in sizes of 1U and 2U.

2U Cable Manager with 5 D-rings

2U Cable Manager with End Rings Manager

It is a metal open-frame cable manager with vertical four rings and two horizontal rings, providing better cord management. It is also compatible with most standard 19” enclosures and open frame server racks, mounting hardware included. The end-rings will somehow protect the cables in case of unnecessary bending.

2U Cable Manager with End Rings Manager

All these 2U cable managers have 1U versions. To meet your various requirements, we strive to keep improving, innovates unceasingly, making the FS.COM attentively the first-class enterprise.

Collections of Cable Manager for Rack

Introduction

Long before the born of cable manager, the mess cable management with cables hanging here and there has been a cloud over the data centre and server room. How can you realize each smooth and convenient operation on your network application with network cables looking like messy spaghetti? Here we list four common cable managers to simplify your cabling and minimize the trouble during operation.

Different Types of Cable Manager

The following cable managers which you may have heard of or seen before are the most popular types in the market. Each has its unique design and characteristics.

Cable Manager with Brush Strip

The panel is designed to be mounted on any 19in EIA style rack or cabinet and features built-in brush that allows passage of up to 25 cables while blocking airflow, ensuring optimal thermal performance. The steel construction provides durability, resists corrosion, and keeps your rack looking smooth and professional.

cable manager with brush strip

Cable Manager with Finger Duct

The FS.COM finger duct horizontal cable manager is designed with flexible fingers, rear pass-through holes and a removable cover. The soft and durable finger ducts offer proper bend radius and flexible operation of cable management, keeping the structured cabling system unhurt and totally functional.

cable manager with finger duct

Cable Manager with D-rings

The name of D-rings cable manager originates from the fact that five metal D-rings stand vertically on the cable management panel in a good order. Horizontal cable management panels with D Rings are built with steel for strength and durability. Easily route large amounts of cable through robust rings. The D-Rings organize patch cords and maintain a required bend radius. They are available in sizes of 1U and 2U.

cable manager with D-rings

Cable Manager with Bend Radius Finger

This cable manager is equipped with six or five bend radius control fingers, consuming much fewer material. The total length of it is 222mm. Light in weight, this type of bracket can be installed in specific areas of the rack, rather than along its entire height. Moreover, it can be stacked to reach any height(U), so it can be an alternative of higher vertical cable management.

cable manager with bend radius finger

How to Apply Cable Manager

Cable managers often come together with patch panel to make the patch cables in the front side of patch panel more orderly. Generally, in a server rack, the cable can’t either be put solely on cable manager since it is incompetent for termination, or be applied to just a patch panel due to its imperfect cable management. Therefore, to realize the perfect cable management, we need to deploy this couple at the same time. The cables going out from the patch panel have already gone through the management process, but it should go to the next cable manager installed above or below the patch panel, so that the whole cable management can be finished. Additionally, some people will need the further step to bring the cables that are from horizontal cable management to the vertical cable managers standing at the both sides of the cabinet.

Conclusion

Never look down upon cable management, otherwise the cables haphazardly thrown around will be your nightmare. In case it damages the wires and cause other hazards, now it’s time to arrange your cables properly. FS.COM has many kinds of cable managers to help make your life neater!

How to Punch Down Cat6 into Patch Panel

When it comes to punching down Ethernet patch panel, unlike feed through patch panel which provides patching without punching down the wires to the ports, punch down patch panel is a kind of network patch panel that should punch down Ethernet cable on the rear side. On the front plate, RJ45 ports, marked with number for easy identification, can be directly connect Ethernet copper cable. For example, simply punch down the twisted pair cabling in the back of the 24 port patch panel and you are ready to plug in RJ45 patch leads in the front.

punch down patch panel

Punch down types are available in Cat6 or Cat5e patch panel. Category 6 cables have stricter standards for reducing system noise and avoid crosstalk, much better than Cat5 or Cat3, which means less network interference and better performance. Here comes the question: how to punch down Cat6 into patch panel.

After experiencing myself and watching countless videos performed by others, I summary the procedure into the brief seven steps and hope it can help you when fixing the devices.

  • First, determine the length of cables you need. Do not overlook this step as it will help save materials as much as possible, though many think the cable is not expensive.
  • Second, peel the outside protective jacket about 3-6 inches from the cable end with cable stripping tools.
  • Third, after removing the cable jacket, you should cut off the plastic spine surrounded by pairs as close to the cables end as possible and then separate the wire pairs. Try to straighten the ends so that you can do the termination easily. Pull on the spine and fold the pairs back. Then cut the spine .
  • Fourth, place the cable wires into the slot on the patch panel. Make sure when you put them in the patch panel, you put them firmly so they don’t move before you punching down. Choose a port on the patch panel to begin terminating. Usually we start with the 1st port. Then insert each wire into its own slot. Don’t leave wires exposed too much or twisted to avoid signal loss.
  • Fifth, terminate the wires. Once you have all your wires in place, you have to take a punch down tool and punch down the wires into the patch panel. Push down the tool and cut the end of wire off. It is also OK to twist it off. After punching down the wire, your panel is looking nice and clean without surplus wires.
  • Sixth, inspect the wire. Once you’ve finished terminating the wires, use a cable tester to check if all the wires are correctly terminated.
  • Seventh, once you are done. Use a clip to prevent wires slipping out by accident.

When the punching down process is completed, you can place the patch panel into the racks with screws. However, any step being missed may result in more or less damage. Be careful and you can make a step list by yourself and mark the steps you have finished to avoid mistakes. Punch down patch panels, Cat6 cables as well as accessories appeared in the process are available in FS.COM. If you still have some difficulties after reading this article, the expertise on our website can help you install our products step by step by remote instruction online.