Category Archives: Fiber Optic Tools

How to Choose a Right OTDR?

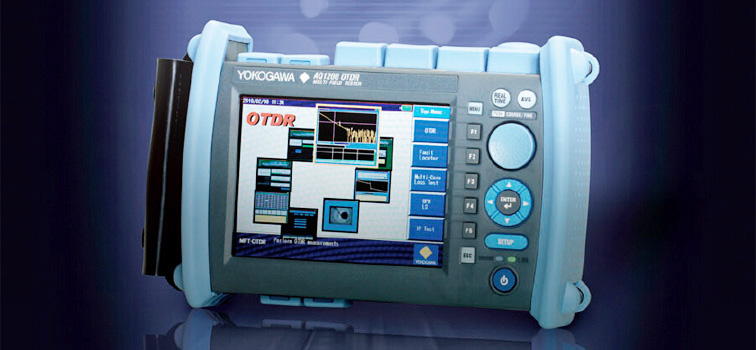
An optical time-domain reflectometre (OTDR) is an optoelectronic instrument used to measure fibre loss, the loss and reflectance of fibre splices, and to locate loss irregularities within the fibre. Now there are many types of OTDRs providing different test and measurement needs including very simple fault finders and advanced OTDRs for link certification. Then, how to choose the right one?
aq1200-mft-otdr

First, you should evaluate your needs. Installing or maintaining fibre? For simple maintenance, a simple or low cost OTDR is good. It’s easy to use, requires the lowest possible investment and some even provides total link loss and optical return loss values. For not very complex installation, you should choose a mini OTDR based on the following key parametres for your specific environment.

Dynamic Range

This specification determines the total optical loss that the OTDR can analyze; i.e., the overall length of a fibre link that can be measured by the unit. The higher the dynamic range, the longer the distance the OTDR can analyze. Insufficient dynamic range will influence the ability to measure the complete link length and affect the accuracy of the link loss, attenuation and far-end connector losses. It’s good to choose an OTDR whose dynamic range is 5 to 8 dB higher than the maximum loss you will encounter.

Dead Zones

Dead zones originate from reflective events (connectors, mechanical splices, etc.) along the link, and they affect the OTDR’s ability to accurately measure attenuation on shorter links and differentiate closely spaced events, such as connectors in patch panels, etc. There are two types of dead zones to specify OTDR performance:

Attenuation dead zone refers to the minimum distance required, after a reflective event, for the OTDR to measure a reflective or non-reflective event loss. Try to choose OTDR with the shortest possible attenuation dead zone to measure short links and to characterize or find faults in patchcords and leads. Industry standard values range from 3 m to 10 m for this specification.

Event dead zone is the distance after a reflective event starts until another reflection can be detected. If a reflective event is within the event dead zone of the preceding event. Industry standard values range from 1 m to 5 m for this specification. The event dead zone specification is always smaller than the attenuation dead zone specification.

Sampling Resolution

Sampling resolution refers to the minimum distance between two consecutive sampling points acquired by the instrument. This is a quite important parametre as it defines the ultimate distance accuracy and fault-finding capability of the OTDR.

Pass/Fail Thresholds

This parametre is also important because lots of time can be saved in the analysis of OTDR traces if you set Pass/Fail thresholds for parametres of interest (e.g., such as splice loss or connector reflection). These thresholds highlight parametres that have exceeded a Warning or Fail limit set and, when used in conjunction with reporting software, it can rapidly provide re-work sheets for installation/commissioning engineers.

Report Generation

If an OTDR has specialized post-processing software allowing fast and easy generation of OTDR reports, it can save up to 90% post-processing time. These can also include bidirectional analyses of OTDR traces and summary reports for high-fibre-count cables.

To choose a right OTDR for your test application, you should better consider the above factors. FS offers YOKOGAWA AQ1200A, EXFO AXS-110-23B-04B OTDR, etc,. with great accuracy, measurement range and instrument resolution. There must be one suitable for you and helpful to maximize your return on investment.

Originally published at http://www.articlesfactory.com/articles/communication/how-to-choose-a-right-otdr.html

Related article: What Should You Know Before Using an OTDR?

Fibre Optic Cleaving

To get good fibre optic splices or terminations, especially when using the pre-polished connectors with internal splices, it is essential to cleave the fibre clearly. The term “cleaving” may be somewhat confusing. This article will give you a thorough introduction of it.

Description of Fibre Optic Cleaving

Cleaving is a process of controlled breaking of a bare fibre, which intends to create a perfectly flat endface, perpendicular to the longitudinal axis of the fibre. It begins with making a tiny scratch on the side of the fibre by using a sharp diamond, carbide or ceramic blade, before or while some defined tension or bending is applied to the fibre. Then the fibre breaks and starts at the mentioned scratch point and the scratch propagates rapidly over the full fibre cross-section, leaving a very clean surface on the obtained two fibre ends.

Note: Cleaving is not cutting just breaking in the bulk of the process. And before cleaving, a fibre coating needs to be stripped off with a coating stripper tool, or dissolved with a suitable solvent.

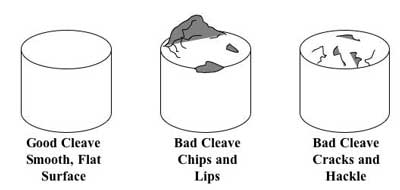
cleave-examples

Importance of Fibre Optic Cleaving

Cleaving is one of the important steps in the preparation for a fibre splice operation. The better results fibre cleaving has, the less splicing loss is. Otherwise, problematic cases occur. For instance, if the fibre ends are not precisely cleaved, the ends will not be mated properly. If the cleaved ends are at an angle, there will be a gap between the fibres that will cause loss in a mechanical splice or uneven fusion splicing. If there is a protrusion, or lip, on one of the fibres, the two fibres will not butt up against each other. If there are surface defects, called hackle or mist, the ends will reflect or diffuse light, causing loss.

Fibre Optic Cleaving Tools

There are two tools used for fibre optic cleaving: cleaver and pen-shaped scribe. Those two tools will be depicted in the following context to make you have a further understanding of cleaving.

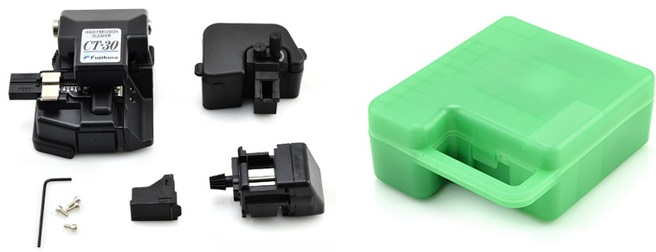
A cleaver is a tool that holds the fibre under low tension, scores the surface at the proper location, then applies greater tension until the fibre breaks. As a good cleaver is automatic and produces consistent results, the user need only clamp the fibre into the cleaver and operate its controls.

A pen-shaped scribe is typically used to remove excess fibre from the end of a connector before polishing. It looks like a ballpoint pen, but has a small wedge tip made of diamond or other hard material and applied to scratch the fibre manually. It is used with the “scratch and pull” technique. First the fibre is scribed perpendicular to its length. Then the fibre is pulled to be broken at the scribe. As conducted manually, it requires experienced operators to produce good cleaves.

ct-30 detail

For more information, please visit FS.COM or contact us over sales@fs.com.

Knowledge of Punch Down Tool

Introduction of Punch Down Tool

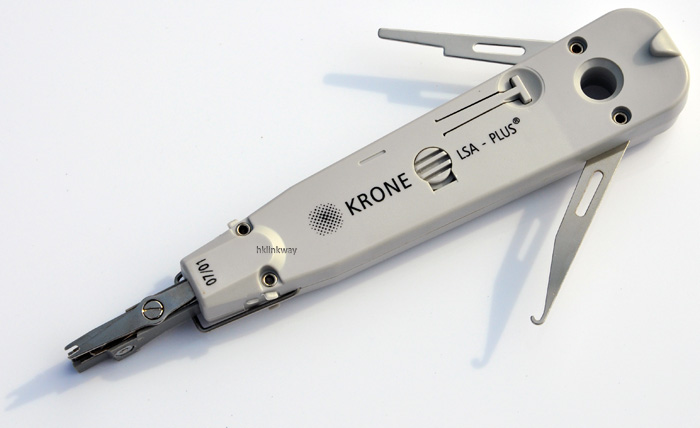
Punch down tool, also called punch down tool or krone tool (named after the KRONE LSA-PLUS connector), is a small hand tool used by telecom and data network technicians to install wiring for telephone, computer and various audio network, designing for inserting wire into insulation-displacement connectors on punch down blocks, patch panels, keystone modules, and surface mount boxes (also known as biscuit jacks). Its name is derived from the method by which the tool pushes a solid copper wire between metal blades on the connection block and cuts off the excess by punching the tool, driving the tool blade through the wire.

Applications of Punch Down Tool

Punch down tool is commonly used for termination works in the coppper network builted by twisted-pair cables like the Cat5, Cat5e, Cat6 and some newer standard Ethernet cables. With cables terminated with keystone jacks, cross-connect blocks or patch panels, networks run smoothly, enhancing working efficiency and reducing losses. For instance, it is widely used by IT staff to ensure successful connections between computers and data centre, maintaining a high level of transmission.

punch down tool

Tips When Using Punch Down Tool

Procedures

  • Hold the wire in your hand and lace it through the correct slots on the connection block. Repeat with other wires that need to be inserted in the connection block.
  • Hold the punch down tool with the blade facing down. Align the blades with the wires on the connection block.
  • Punch down the wire by holding the wire and pushing the tool firmly into the block. This should connect the wire to the terminal and cut off any excess wire at the same time.
  • Test the connection you just created. Pull on the wires to make sure they are attached properly.

Note: It is essential that the tool blade should not cut throughout the wire insulation to make contact, but rather the sharp edges of the slot in the contact post itself slice through the insulation. In addition, punch down tool is also used to cut off excessive wire in the same operation.

Warnings

  • Always wear safety glasses when using a punch down tool.
  • Models with interchangeable blades will extend the life of your tool.
  • Use the pressure adjustment screw or knob to set the tool to a comfortable level for your use.
  • Never use a punch down tool to tighten flat head screws because this can break the cutting blade.
  • Although the tool is usually made of plastic, there still is a shock hazard when working with electrical circuits.

FS.COM offers impact punch down tool with competitive price such as the 110 punch down tool, Krone punch down tool. Please visit our website or contact us over sales@fs.com

Introduction of Phone Line Tester

Description of Phone Line Tester

Phone line tester is a pockets-sized device used for basic troubleshooting of analog phone systems as well as the line polarity. It monitors phone lines for digital-tone quality and signal power, tests of correct jack polarity (detects reversed tip and ring), and indicates call addressing for correct telephone extensions.

What is Phone Line Tester Used For?

Phone line tester is mainly applied to check the operating parameters of the telephone company’s wiring at the modular connector which includes the open circuit or “on-hook” line voltage, the ringer voltage, and the polarity of the line. The phone line’s voltage conditions are indicated by a meter and the polarity of the line connections is indicated by an LED. The wires in the phone cables are colour-coded, with the green wire being the positive side, and the wire being the negative side. When there is no load on the line, that is, when all phones in your home or office are oil hook, the measured voltage at your phone’s modular connector should be greater than 40-volts DC, give or take a smidgen. And normally, polarity is normally not a problem for most standard phones will work regardless of the polarity of the DC voltage on the telephone line. However, reversed line polarity can interfere with certain kinds of switching equipment, in particular, some of the low-cost conference and multi-use switchers, so we’ve provided for that test.

How does a Phone Line Tester work?

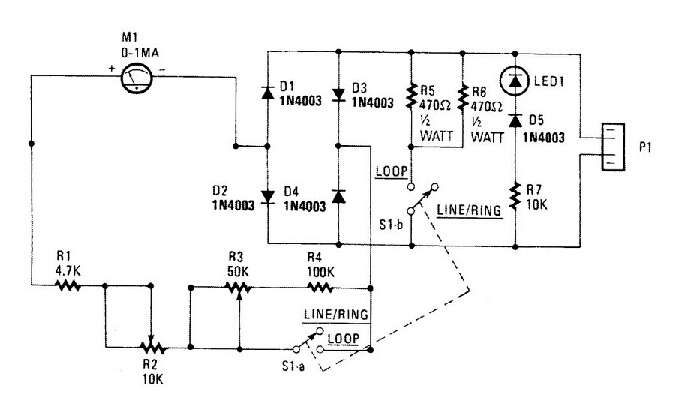
The phone line tester shown in the following picture is connected to the phone line through modular connector P1. The tester only uses two of its four connectors-the red and the green. If it is correct-that is, if the green wire is the positive side-and the red wire is the negative side, nothing will happen. If the situation is reversed. The LED will light. With switch SI Set for LINE/RING. Both S1-a and S1-b are open and the meter indicates the condition of the line-voltage. Any line voltage reading in the LINE OK range (more on the meter in a moment) indicates a line voltage higher than 40-volts DC. If the telephone is caused to ring, either by using a ring back number or by dialing from another phone, the meter will indicate RING OK, and the LED will pulse (indicating AC), if the ringing voltage/current is correct. The actual position of the meter’s pointer depends on how ringers are connected across the line. (Three or more of the old-fashioned ringers can excessively load the ringing voltage if the local telephone company has not corrected for your ringer load.) When S1 is closed the voltage range of the meter is changed and a nominal load resistance of 230 ohms (R5 and R6) is connected across the line to emulate the off hook load of the telephone. If the meter indicates LOOP OK, you can be certain that you have sufficient loop voltage for satisfactory telephone operation. If you place another load on the line, perhaps by taking an extension telephone off hook, the meter reading will almost invariably drop below the LOOP OK range. That is perfectly normal; the line is operating properly when a single loop load results in a LOOP OK meter reading. That is how to test telephones for proper connection. If lifting the handset causes the meter reading to drop, you can at least be certain that the telephone’s hook switch is working and that the repeat coil is connected to the line.

line tester

Features of Phone Line Tester

  • Receiving and reproducing telephone system dial tone to determine the quality of the tone
  • Equipped for jack and cross-connect systems access
  • Receiving tracing signals for identifying specific conductors in a cable run (TRACE function requires a separate tone generator)
  • Volume control to adjust test tones
  • Durable, moisture-resistant case and speaker for long-life durability

Introduction of Network Tester

Network tester is a device used for logging and monitoring your internet connection, network or maintain uptime stability. It is a dispensable tool for managers to troubleshoot network problems and maintain the network actively, such as troubleshooting your video, audio, data, and voice network cables during installation or testing to make sure your signal is good.

Network testers can be divided into different types depending on two standards: network transmission and function media. By network transmission media they can be divided into two kinds: wireless network testers and line network testers. And by its function they can be classified into three types: cable testers, multifunction network testers and network performance testers. Of those various types of testers, the most common used network tester for network administrators and installers is cable tester which is designed to test the strength and connectivity of a particular type of cable or other wired assemblies. It can test whether cables or wires are set up and connected appropriately and if the communication strength between the source and destination is strong enough to serve its intended purpose.

Network Cable TesterNetwork testers are mainly applied in two aspects, one is testing and maintaining the equality and data of network construction equipment which is widely used in comprehensive wiring system. Another is troubleshooting problems of network maintenance equipment which attached importance to products’ multiple functions and applications. And network testers are utilized in a wide range of fields including LAN administration, comprehensive wiring system, data centres, bandwidth operation, and network computer lab.

There are few tips for you when using network tester.

  • Some important network characteristics including utilisation levels, number of users, and application utilisation must be noticed and each network should be evaluated individually.
  • Comprehensive network testing will enable a network manager to maintain the network with high efficiency. So a properly implemented network testing schedule is of high importance which provides a valuable insight to trends or changes in the network’s daily operation. This insight may allow the network manager to predict network operation under a given load, or anticipate problems created by new services.

Fiberstore offers various network cable testers, from basic to complicated,with high quality at good prices. FiberStore supplies so many kinds of LAN Network Cable Tester, which are a kind of convenient and comprehensive tool for network professionals.

Things You Shoud Know about Fiber Optic Cleaning

Fiber optic cleaning is one of the most basic and important procedures for the maintenance of fiber optic systems. Its goal is to keep all optical connections free of contaminants to avoid losses caused by dirt, dust and other contaminants, ensuring a high-speed data transmission over optical fibers. This post aims to introduce some of the useful fiber optic cleaning tools and give some tips on fiber optic cleaning process.

Tools of Fiber Optic Cleaning
A wide variety of fiber optic cleaners are provided to complete the cleaning procedure, such as push-type cleaners, reel-type cleaners, wipes and cleaning cards, cleaning sticks, tips and swabs and so on. Because a good fiber optic cleaning will need all kinds of these tools. Thus, many vendors offer the fiber cleaning kits which consist of all kinds of tools to meet customers’ specific application needs with high efficiency of cleaning end-faces. Here we are going to introduce some commonly used fiber optic cleaning tools.下载

Push-type cleaners are equipped with an easy one push action which quickly and effectively clean the end-face of connectors on jumpers or through adapters. It is one of the useful ways to clean connectors and maximize network performance with a low cost. Reel-type cleaner are designed to clean a variety of connectors. They are safe cleaning options without the need for alcohol, which can be toxic and flammable. And their refillable cleaning tapes making them ideal for lab, assembly lines and field use. Wipes and Cleaning Cards are also the indispensable tools designed to be used dry or with cleaning fluid for effectively removing common contaminants from optical jumpers and parch cords. Cleaning sticks, Tips and Swaps are specifically intended for cleaning fiber optic connector end-faces.

Tips For Fiber Optic Cleaning
Cleaning Methods
Fiber optic cleaning kits, containing above tools, can be divided to four types based on different cleaning methods: dry cleaning, wet cleaning, abrasive cleaning and non-abrasive cleaning. Drying cleaning is a kind of way in which optic cleaning use no solvent. For instance, air spray, lint free wipes, reel based fiber connector cleaner, cletop stick and so on are all dry cleaning products ideal for cleaning transceiver ports. However, wet cleaning is conducted on the opposite way. Products such as alcohol with lint-free wipes and pre-saturated or soaked wipes use a solvent to clean. And the other two cleaning methods are abrasive cleaning and non-abrasive cleaning classified by whether the abrasive material touching the fiber optic connector end-face.

Cleaning Procedures
In order to make sure that you do a good job of fiber optic cleaning, you are required to complete following steps when cleaning.

  • Inspect the fiber connector, component, or bulkhead with a fiberscope. If the connector is dirty, clean it with a dry cleaning technique.
  • Inspect the connector. If the connector is still dirty, repeat the dry cleaning technique.
  • Inspect the connector. If the connector is still dirty, clean it with a wet cleaning technique followed immediately with a dry clean in order to ensure no residue is left on the end-face. (Note: Wet cleaning is not recommended for bulkheads and receptacles. Damage to equipment can occur.)
  • Inspect the connector again. If the contaminate still cannot be removed, repeat the cleaning procedure until the end-face is clean.

For more information of fiber optic cleaning and fiber optic cleaning tools, please visit fs.com or contact us over sales@fs.com.

Choose The Right Fibre Optic Tools For Cable Splicing And Terminating

Correctly splicing and terminating fibre optic cable requires special tools and methods. Training is essential and there are many excellent causes of training available. Do not mix your electrical tools with your fibre tools. Use the right tools to do the job! Being experienced in fibre work will end up increasingly necessary because the importance of data transmission speeds, fibre towards the home and fibre to the premise deployments still increase.

Many factors set fibre installations apart from traditional electrical projects. Fibre optic glass is very fragile; it’s nominal outside diameter is 125 micron. The slightest scratch, mark or perhaps speck of dirt will affect the transmission of light, degrading the signal. Safety factors are important because you will work with glass that can sliver to your skin without being seen through the human eye. Transmission grade lasers are extremely dangerous, and require that protective eyewear is a must. This industry has primarily been coping with voice and data grade circuits that may tolerate some interruption or slow down of signal. The person speaking would repeat themselves, or even the data would retransmit. Today we are dealing with IPTV signals and customers who’ll not tolerate pixelization, or momentary locking from the picture. All the situations mentioned are reason for the client to look for another carrier. Each situation might have been avoided if proper attention was handed towards the techniques used when preparing, installing, and maintaining fibre optic cables.

Jacket Strippers are utilized to remove the 1.6 – 3.0mm PVC outer jacket on simplex and duplex fibre cables. Fibre Cutters will cut and trim the kevlar strength member directly underneath the jacket and Buffer Strippers will take away the acrylate (buffer) coating from the bare glass. A protective plastic coating is used to the bare fibre after the drawing process, but just before spooling. The most typical coating is really a UV-cured acrylate, that is applied in two layers, producing a nominal outside diameter of 250 micron for that coated fibre. The coating is highly engineered, providing protection against physical damage caused by environmental elements, such as humidity and temperature extremes, contact with chemicals, reason for stress… etc. whilst minimizing optical loss. Without it, the manufacturer wouldn’t be in a position to spool the fibre without breaking it. The 250 micron-coated fibre may be the building block for a lot of common fibre optic cable constructions. It is usually used as is, particularly when additional mechanical or environmental protection is not needed, for example inside of optical devices or splice closures. For additional physical protection and easy handling, a secondary coating of polyvinyl chloride (PVC) or Hytrel (a thermoplastic elastomer that has desirable characteristics to be used as a secondary buffer) is extruded within the 250 micron-coated fibre, increasing the outside diameter as much as 900 micron. This kind of construction is called ‘tight buffered fibre’. Tight Buffered may be single or multi fibre and are observed in Premise Networks and indoor applications. Multi-fibre, tight-buffered cables often can be used for intra-building, risers, general building and plenum applications.

‘Loose tube fibre’ usually includes a bundle of fibres enclosed inside a thermoplastic tube referred to as a buffer tube, which has an inner diameter that is slightly larger than the diameter of the fibre. Loose tube fibre has a space for the fibres to grow. In a few climate conditions, a fibre may expand after which shrink over and over again or it may be exposed to water. Fibre Cables will sometimes have ‘gel’ within this cavity (or space) yet others that are labeled ‘dry block’. You will find many loose tube fibres in Outside Plant Environments. The modular design of loose-tube cables typically stands up to 12 fibres per buffer tube with a maximum per cable fibre count in excess of 200 fibres. Loose-tube cables can be all-dielectric or optionally armored. The armoring is used to protect the cable from rodents such as squirrels or beavers, or from protruding rocks in a buried environment. The modular buffer-tube design also permits easy drop-off of categories of fibres at intermediate points, without disturbing other protected buffer tubes being routed to other locations. The loose-tube design also helps in the identification and administration of fibres within the system. When protective gel is present, a gel-cleaner such as D-Gel will be needed. Each fibre will be cleaned with the gel cleaner and 99% alcohol. Clean room wipers (Kim Wipes) are a good choice to use with the soap. The fibres inside a loose tube gel filled cable will often have a 250 micron coating so that they tend to be more fragile than the usual tight-buffered fibre. Standard industry colour-coding can also be accustomed to identify the buffers along with the fibres in the buffers.

A ‘Rotary Tool’ or ‘Cable Slitter‘ can be used to slit a diamond ring around and thru the outer jacketing of ‘loose tube fibre’. Once you expose the durable inner buffer tube, you can use a ‘Universal Fibre Access Tool’ that is designed for single central buffer tube entry. Utilized on the same principle because the Mid Span Access Tool, (which allows access to the multicoloured buffer coated tight buffered fibres) dual blades will slit the tube lengthwise, exposing the buffer coated fibres. Fibre handling tools such as a spatula or perhaps a pick can help the installer to access the fibre in need of testing or repair. Once the damaged fibre is exposed a hand- stripping tool will be used to take away the 250 micron coating in order to work with the bare fibre. The next step is going to be cleaning the fibre end and preparing it to be cleaved. A great cleave is among the most important factors of manufacturing a low loss on the splice or a termination. A Fibre Optic Cleaver is really a multipurpose tool that measures distance in the end of the buffer coating enough where it will likely be joined also it precisely cuts the glass. Always remember to utilize a fibre trash-can for that scraps of glass cleaved from the fibre cable.

When performing fusion splicing you may need a Fusion Splicer, fusion splice protection sleeves, and isopropyl alcohol and stripping tools. If you are using a mechanical splice, you will need stripping tools, mechanical splices, isopropyl alcohol and a mechanical splice assembly tool. When hand terminating a fibre you will need 99% isopropyl alcohol, epoxy/adhesive, a syringe and needle, polishing (lapping) film, a polishing pad, a polishing puck, a crimp tool, stripping tools, fibre optic connectors (or splice on connectors) and piano wire.

Whenever a termination is complete you have to inspect the finish face of the connector having a Fibre Optic Inspection Microscope. Ensuring light is getting most likely through the splice or even the connection, a visible Fault Locator may be used. This piece of equipment will shoot a visible laser down the fibre cable so you can tell there are no breaks or faulty splices. If the laser light stops on the fibre somewhere, there’s most likely a break in the glass at that point. If you find more than a dull light showing in the connector point, the termination was not successful. The light should also pass through the fusion splice, if it does not, stop and re- splice or re-terminate.